|
Tagging Palette
The Palette
For the buttons and executable commands that are described n this section to work it is assumed that you have installed A WorkLife FrameWork™ and have loaded it. This can be done either from the Load WorkLife Framework button on the supplied palette, by executing the command Needs["Diary`Diary`"], or by clicking on the following button:
By clicking on the on the Tagging button on the All Palettes Palette, you will open the Tagging Palette. You can also open the Tagging Palette by executing:

The Tagging Palette provides administrative buttons for tagging cells in Mathematica Notebooks and manipulating those notebooks based on the CellTags within them.
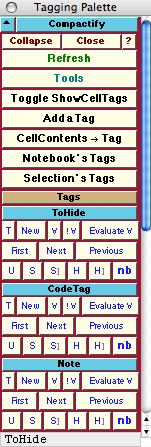
An example of the Tagging Palette looks like:

The Tagging Palette
This image shows an example of this Palette for the case where there are three tags listed: "ToHide", "CodeTag", and "Note". The tags shown in this Palette are governed by the current value of the parameter $TaggingList. All three of "ToHide", "CodeTag", and "Note" always appear at the top of the Tagging Palette. The "ToHide" tag is intended to be used on cells that you generally wish to toggle from being visible to invisible, and the "CodeTag" is generally intended to be used for those executable cells that you may want to execute independent of any other executable cells in a given Notebook. In this way it can act to create a different set of "Initialization Cells" that you can use to reexecute selected cells in the Notebook. This is for convenience—as you will see in the following discussion of the palette buttons in the Tagging Palette, any tag in the notebook can be used for this purpose, thus allowing for an arbitrary number of effective "Initialization Cells." Finally the "Note" tag is intended for commentar and notes that you might want to be aboe to quickly extract from a notebook..
The Palette Buttons
For the buttons and executable commands that are described n this section to work it is assumed that you have installed A WorkLife FrameWork™ and have loaded it. This can be done either from the Load WorkLife Framework button on the supplied palette, by executing the command Needs["Diary`Diary`"], or by clicking on the following button:

The Toggle ShowCellTags button performs the same functions as Mathematica's Find |> Show Cell Tags menu item. It toggles between displaying and hiding all of the Notebook's Cell's CellTags.

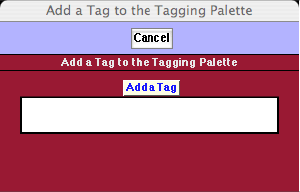
The Add a Tag button opens a dialog that allows you to add a new tag to the list of tags and their associated buttons included below in this Palette. Through the dialog the Add a Tag button adds the new tag to the parameter $TaggingList.
This dialog looks like:

The Add a Tag Dialog

The CellContents→Tag button takes the contents of the selected Cell in the current InputNotebook and adds it to the list of CellTags for that cell. This, of course, should be used carefully since it can lead to very unwieldy tags.

The Notebook's Tags button reads all of the CellTags from the current InputNotebook and changes all of the buttons that follow to reflect that set of tags. The current set of buttons displayed is governed by the list of tags in the parameter $TaggingList.

The Selection's Tags button reads all of the CellTags from the current selection in the current InputNotebook and changes all of the buttons that follow to reflect that set of tags. The current set of buttons displayed is governed by the list of tags in the parameter $TaggingList.

This is a heading button for the sets of buttons that follow.
In the following we illustrate the buttons for each tag with the specific case of the "ToHide" tag.

Opens and closes the ToHide sub-palette for the "ToHide" CellTag which includes the buttons that follow.

This first set of buttons has the following behaviors:
T: Tags the currently selected cells in the current InputNotebook with the "ToHide" CellTag.
New: Creates a new cell below the current selection in the current InputNotebook that is tagged with the "ToHide" CellTag.
∀: Selects all of the cells that have been tagged with the "ToHide" CellTag in the current InputNotebook.
!∀: Selects all of the cells that have not been tagged with the "ToHide" CellTag in the current InputNotebook.
Evaluate ∀: Evaluates all of the cells with the given tag if they are evaluatable cells (such as Input cells).

First: Selects the first cell t in the current InputNotebook hat has the "ToHide" CellTag.
Next: Moves the selection to the next cell that has the "ToHide" CellTag in the current InputNotebook.
Previous: Moves the selection to the previous cell that has the "ToHide" CellTag in the current InputNotebook.

This second set of buttons has the following behaviors:
U: Removes the "ToHide" CellTag from the currently selected cells in the current InputNotebook if any have that CellTag.
S: Shows (Opens) all of the cells in the current InputNotebook with the "ToHide" CellTag if they have been hidden (Closed). If their CellBrackets have been hidden then this button only shows the cells, it does not make their CellBrackets visible.
S]: Shows (Opens) all of the cells in the current InputNotebook with the "ToHide" CellTag if they have been hidden (Closed) and makes their CellBrackets visible if they have been made invisible.
H: Hides (Closes) all of the cells in the current InputNotebook with the "ToHide" CellTag if they are open. If their CellBrackets are visible then this button only hides the cells, it does not make their CellBrackets invisible.
H]: Hides (Closes) all of the cells in the current InputNotebook with the "ToHide" CellTag if they are open. If their CellBrackets are visible then this button also hides their CellBrackets.
nb: Creates and opens a new Notebook with that cells that were tagged.
The buttons for the "CodeTag" and "Note" tags—as well as any others that might appear on this Palette—all serve the same functoin as the ones above.
Copyright ©, 2005→2009 Scientific Arts, LLC. All rights reserved.
|