Starting Up
Obtaining a Password
If you have not purchased a license for A WorkLife FrameWork™ you can do so at the Scientific Arts website:
http://scientificarts.com/worklife/purchase
After purchasing a license you can then request a password with the following form (click on the link to open the form):
Password Request Form
If you do not wish to purchase a license at this time you may still use A WorkLife FrameWork™ for a 15 day trial period. To request a trial password use the following form (again, click on the link to open the form):
Trial Password Request Form
Quick Start
To install the package and its password without reading the rest of this file first, follow the following directions.
To install the package, open the InstallWorkLifeFrameWork.nb notebook (located in the top level Directory of the WorkLife FrameWork™ distribution directory) from within Mathematica or click on the following Button:
The password installation dialog will open after you install the product. To install the password separately (after installing the product) you can open the InstallWorkLifeFrameWorkPassword.nb notebook (located in the top level Directory of the WorkLife FrameWork™ distribution directory) from within Mathematica or click on the following Button:
Installing the Package
This ReadMeFirst notebook is contained within the top level Directory of the WorkLife FrameWork™ distribution directory. If you received this software via a download from the web, it will generally be in compressed form. To proceed further you must extract the files from the compressed archive using the standard method provided by your Operating System. Once this is done you should reopen this ReadMeFirst.nb file from within Mathematica.
To install the package, open the InstallWorkLifeFrameWork.nb notebook (located in the top level Directory of the WorkLife FrameWork™ distribution directory) from within Mathematica or click on the following Button:
The InstallWorkLifeFrameWork.nb notebook is located in the WorkLifeFrameWork directory of the distribution that you downloaded. You can either open this installer directly from Mathematica or from the Button above.
After the installation is complete a dialog will also open in Mathematica to allow you to enter a password. A valid password can be obtained by purchasing a software license from Scientific Arts, LLC or one of it's authorized distributors.
If you have not yet paid for and obtained a license you can do so at the following web site:
http://scientificarts.com/worklife/purchase
The Installer Dialog looks like:
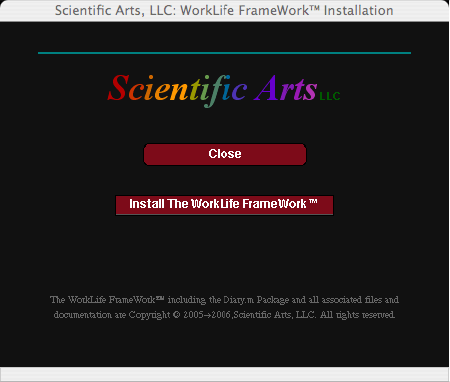
The WorkLife FrameWork™ Installation Dialog
To Install the WorkLife FrameWork™ package simply click on the Install The WorkLife FrameWork™ button. As the package installs, several progress messages will appear below the button. After installation, the Mathematica Help Browser will be updated and then it will open to the WorkLife FrameWork's™ documentation so that you may read about how to begin using the WorkLife FrameWork™.
Installing the Password
To use the WorkLife FrameWork™ package it must be supplied with a password. After paying for the package and registering you will receive a password via email from Scientific Arts, LLC.
The password installation dialog will open after you install the product. To install the password separately (after installing the product) you can open the InstallWorkLifeFrameWorkPassword.nb notebook (located in the top level Directory of the WorkLife FrameWork™ distribution directory) from within Mathematica or click on the following Button:
The InstallWorkLifeFrameWorkPassword.nb notebook is located in the WorkLifeFrameWork directory of the distribution that you downloaded. You can either open this password installer directly from Mathematica, from the Button above, or use the password installer that opens when you have completed installing the WorkLife FrameWork™.
The Password Installer Dialog looks like:
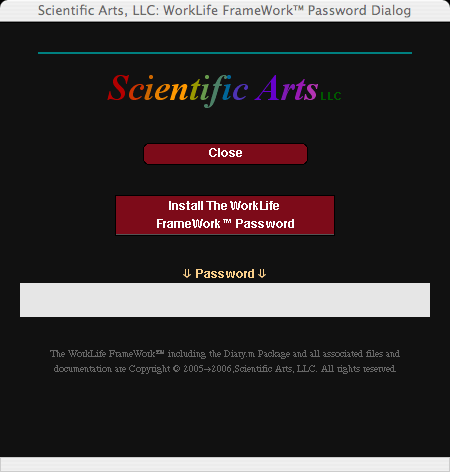
The WorkLife FrameWork™ Password Dialog
Type your password in the Text field under the ⇓Password⇓ and then click on the Install The WorkLife FrameWork Password Button. The Password that you supplied with then be installed.
Introductory Slide Show
You can view an introductory self-paced Slide Show on the WorkLife FrameWork™ by clicking on the following button after the package has been installed (viewing the Slide Show doesn't require that the password has been installed):
Starting the package
Initialization
If the package has been properly installed, then executing

will make the package available for use.
There also is a small palette that will appear on your File|>Palettes menu as the Load WorkLife FrameWork Palette. Clicking on its single button will load the Worklife FrameWork™ if it has been properly installed. That Palette looks like:

The Load WorkLife FrameWork™ Palette
As the package is loading a progress screen will display. The progress screen looks like the following:
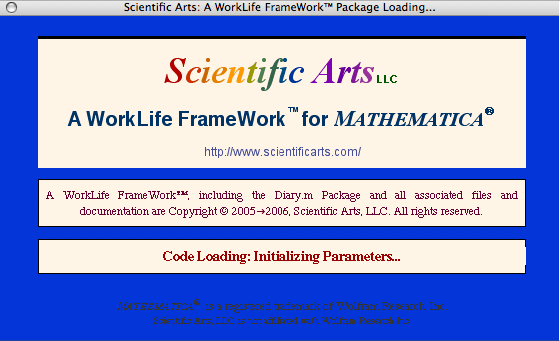
The WorkLife FrameWork™ Startup Screen
First Time Use of the Package
If this is the first time you are using the WorkLife FrameWork™ Package a special dialog will appear.
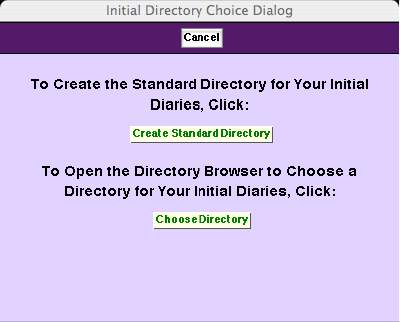
The WorkLife FrameWork's™ Select Directory Dialog: It only opens the first time you use the WorkLife FrameWork™
The two buttons on this dialog have the following behaviors.

The Create Standard Directory button creates and chooses a default directory for Diaries.

The Choose Directory button brings up the Directory Browser dialog box that allows you to navigate your computer's directories and choose one for the current Diary directory.
General use of the Package
After loading is complete, a number of palettes will display. Which palettes are opened depends on which ones were open the last time you used the package. One palette that is always opened upon loading the package is the WorkLife Tools Palette. (The one exception to this is the first time you use the package where the special palette described earlier will open.)
The WorkLife Tools Palette
The WorkLife Tools Palette the general starting point for using the WorkLife FrameWork™ Package. If it is not visible it can be opened by executing

or by clicking the WorkLife Tools button on the All Palettes Palette.
When first opened or when Compactified the WorkLife Tools Palette looks like the following.

The WorkLife Tools Palette as it appears when first opened
In this image of the WorkLife Tools Palette all of its sub-palettes are seen to be closed. You can toggle between each of these sub-paletts by clicking on their main button—the Diary Access button in the cse of the Diary Access Palette. If you click on the ◂ button to its left, the Diary Access Palette will open as a separate Palette in its own right, and this is the case for the other sub-palettes as well.
Notebook Types and Directories
The WorkLife FrameWork™, organizes your work in Mathematica into Diaries, Work Notebooks, and Package Notebooks. A Diary or group of Diaries sits in a directory that contains directories for the Work Notebooks and Package Notebooks that are associated with it. This is a simple organizational structure, but it becomes very powerful in the WorkLife FrameWork's™ environment.
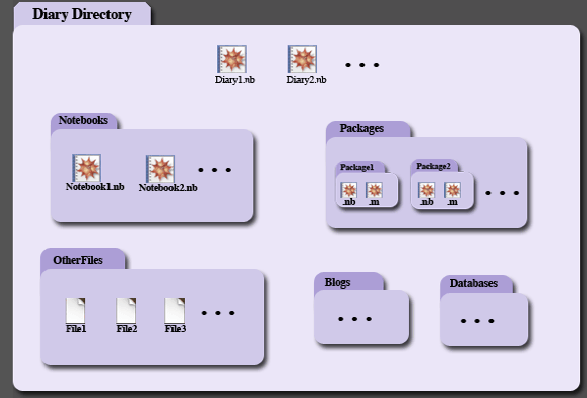
The Directory Structure of a Diary or an Associated Group of Diaries
Here the name "Diary Directory" could be any name that you have chosen for this particular set of diaries. There is no restriction on the number of Diary directories (or their names) or on the number of Diaries in a given Diary directory.
In the WorkLife FrameWork™, as in all Mathematica work in the FrontEnd, your work is done in Mathematica Notebooks. The architecture of Mathematica is remarkable and unique in that everything that you encounter is an expression even if, at first glance, it does not appear to be one. Prime examples are Mathematica Notebooks themselves. This architecture gives Mathematica the ability to interact with itself programmatically.
Every notebook that you make use of is an expression and, by making use of the right programming tools, the contents of the notebooks can be accessed, tracked, modified, and be made use of in further calculations.
From a very conventional perspective a Mathematica notebook is an arbitrary generalization of a spreadsheet; but, indeed, it is much more than that.
The WorkLife FrameWork™ organizes and adds functionality to Notebooks so that they may be used more efficiently as a resource for these arbitrary generalizations. To do this notebooks are categorized into several types with some useful relationships between them.
While most people have a way of organizing their work on their computer's file system, the WorkLife FrameWork™ provides a simple way to keep track of your work and enforces a very basic structure on how notebooks are stored. This structure, as you will see, still allows full creative license about what sorts of things you can do with notebooks, but makes it much easier to do things that you often avoid, and much simpler to keep track of your various distinct projects. But, in addition to this is opens up many new ways that you will ultimately use Mathematica in your day-to-day work flow.
There are three basic types of notebooks: Diaries, Work Notebooks, and Package Notebooks.
Diaries are the central organizational element of the WorkLife FrameWork™. They are of course notebooks, but with special properties and uses, some of which we will explore shortly. They also automatically exist in a directory structure that organizes them with their associated Notebooks and Packages (as well as Databases and other useful things).
Work Notebooks are traditional Mathematica notebooks, but with some additional internal structure that allows them to be tracked and processed more easily. Also these are automatically placed in a directory that organizes them with their associated Diaries. In the WorkLife FrameWork™, these notebooks are simply referred to as "Notebooks."
Package Notebooks are where you create and organize Mathematica code that you want to reuse and share by exporting the code as a .m file that can be read in using Mathematica's function Needs. This is done automatically upon saving these Package Notebooks using a standard Mathematica mechanism. The Package Notebooks are automatically placed in a directory that organizes them with their associated Diaries.
In addition to these three basic notebook types there are other elements that we will discuss later including Databases, Blogs, Tracking Notebooks and other interesting tools.
Each time you choose a directory and create a Diary in it with the WorkLife FrameWork™, that Diary's directory is populated with several subdirectories:
Notebooks
The Work Notebooks are located here. In addition, there is a subdirectory to the Notebooks directory called Scratch. In here are Scratch Notebooks. Often when working in Mathematica, even though you are writing things carefully in a Notebook, you will want to do some quick free form calculations to figure various things out, just as you would with a spare pad of paper while writing something in a more organized fashion. Scratch Notebooks can be created for this purpose (by using the New Scratch button on the Notebooks Palette) and will be automatically stored in the Scratch subdirectory.
Packages
The Package Notebooks are located here.
OtherFiles
Any other files that are relevant to your set of diaries and their associated notebooks are located here. These might be text documents, various types of data files, image files, any other files that are intended to be opened by other applications, or any files other than Mathematica notebooks that are of importance to the work of the particular set of diaries in the containing directory.
Databases
WorkLife FrameWork™ Databases that you have created are located here.
Blogs
Blogs associated with the Diaries in the containing directory are located here.
Other Directories that depend on actions taken on or within a diary...
There may be other directories within a Diary's directory. Whereas all of the preceding directories are always present (and created automatically when a new Diary is created) there are several other directories that might be created if particular actions are taken.
Again, the schematic illustration of the directory structure of a set of Diaries shows how this is organized:
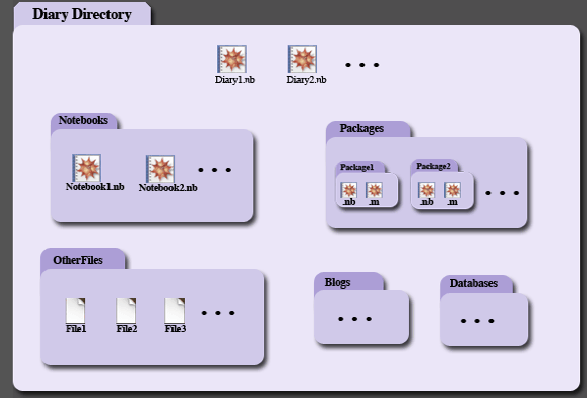
The Directory Structure of a Diary or an Associated Group of Diaries
Next Steps
The material in this ReadMeFirst file is the starting point.
To explore some of the features of this package you can click through several slide shows that are opened with the following buttons.
Introductory Overview
You can view an introductory self-paced Slide Show on the WorkLife FrameWork™ by clicking on the following button after the package has been installed (viewing the Slide Show doesn't require that the password has been installed):
Creating a Diary
An introductory self-paced Slide Show on how to create a Diary. Click on the following button after the package has been installed (viewing this Slide Show doesn't require that the password has been installed):
Simple Journaling
An introductory self-paced Slide Show on how to create a Diary. Click on the following button after the package has been installed (viewing this Slide Show doesn't require that the password has been installed):
More Details
To learn how to use the various Palettes and functions in the WorkLife FrameWork™ in detail please explore the full documentation supplied in the Mathematica Help Browser after the WorkLife FrameWork™ has been installed. To access the WorkLife FrameWork™ documentation please click on the following button, or go to the Mathematica Help Browser under Add Ons and click on Worklife.
Copyright and License Agreement
The use of the WorkLife FrameWork™ software and any of its  documentation is subject to its Software License Agreement. All of the material is Copyright ©, Scientific Arts, LLC 2005→2006, All Rights Reserved. Please review and agree to the Licence Agreement before proceeding. Click here to display the License Agreement. documentation is subject to its Software License Agreement. All of the material is Copyright ©, Scientific Arts, LLC 2005→2006, All Rights Reserved. Please review and agree to the Licence Agreement before proceeding. Click here to display the License Agreement.
Copyright ©, 2005→2009, Scientific Arts, LLC
|