Introduction
The following sections give an introduction to the WorkLife FrameWork™ package.
The View From Above
Prologue
Many Mathematica users wish that they could make greater use of its enormous potential both as a modern programming language and as a technical communication system.
A typical beginning user interacts with the Mathematica notebook interface by using it as an arbitrarily sophisticated technical scratch pad.
The next step often is for the user to start to write simple and then more sophisticated programs in the Mathematica Language.
A parallel experience for most users is to start using the notebook interface to write technical notes and then documents, integrating graphics, typographic textual elements, and typeset formulae into the hierarchy of differing types of cells within a notebook.
Often after a while users make a powerful transition in their use of Mathematica to interacting with its full environment programmatically. One of the unique aspects of Mathematica—and realizing the full extent of this often creates a quantum transition in a user's interaction with Mathematica—is that essentially everything that one encounters when using it is an expression. This is true whether you are calculating  , ,


or writing a program to manipulate a Mathematica Notebook (this is just to illustrate an example of simple Notebook programming, if you are not familiar with this, it's not needed in order to use the WorkLife FrameWork™).

That everything is an expression within Mathematica allows, in essence, the ability to create arbitrarily sophisticated interactions with the mathematical world and with Mathematica's interface.
It also allows you to programmatically organize your work because, with the right tools, the Notebook interface can "know" about itself and useful organizational elements can be designed into your work and expand the scope of what you can do, and what you can see.
Specialized Notebooks
The Mathematica notebook interface is centered on the user working within Notebooks. And, because a Notebook is a Mathematica expression and can be modified and manipulated, it can be specialized for particular purposes.
In the WorkLife FrameWork™ there are three specialized types of Notebooks:
Diaries
Work Notebooks
Scratch Notebooks (a specialized case of a Work Notebook)
Package Notebooks
Of these, Diaries are a central organizing focal points of your work. Sets of Work Notebooks and Package Notebooks (as well as various other files, and entities such as Databases, Blogs, various archives and so on...) are associated with particular Diaries. This directory structure looks like,

The Directory Structure of a Diary or an Associated Group of Diaries
Here the name "Diary Directory" could be any name that you have chosen for this particular set of diaries. There is no restriction on the number of Diary directories (or their names) or on the number of Diaries in a given Diary directory.
Two Layers
For the buttons and executable commands that are described n this section to work it is assumed that you have installed the WorkLife FrameWork™ and have loaded it. This can be done either from the Load WorkLife Framework button on the supplied palette, by executing the command Needs["Diary`Diary`"], or by clicking on the following button:
Palettes, Dialogs, and Toolbars
The standard way to interact with the WorkLife FrameWork™ is through its Palette, Dialog, and Toolbar interface. The WorkLife FrameWork™ has a wide variety of Palettes, and these are covered in detail in the Palettes section of this document.
Functional
The interior of the WorkLife FrameWork™ is, like all Mathematica applications, based on a set of functions that are called to do its work. So, rather than clicking on the New Diary button in the Diary List Palette to create a new Diary, you can execute the function

Or, as another small example, to find the CellTags in the current notebook you can execute

As a more sophisticated example here is a database query for one of the internal databases kept by the WorkLife FrameWork™ which shows information on the Diaries that were opened in the past six hours:
This loads the database and performs the query:

This is an alternative way to compute the same thing (the Database functionality of the WorkLife FrameWork™ gives a number of alternatives for searching WorkLife FrameWork™ databases):

And, yet another way:

This unloads the database to conserve memory

Of course, we are only showing these examples here to give a sense that there are many things that you can do with the WorkLife FrameWork™ above and beyond the many particular things that you can do through the Palette and Dialog interface. And, for many people, this will be sufficient. But others may want to create new applications based on the underlying Functional structure of the WorkLife FrameWork™.
In fact there are quite a few user-accessible functions and parameters to work with in the WorkLife FrameWork™. The total number of functions and parameters exported by the WorkLife FrameWork™ is given by the function NumberOfWorkLifeFunctionsWithUsageMessages.
NumberOfWorkLifeFunctionsWithUsageMessages[] gives the number of functions and parameters exported by this package that are considered to be user-friendly. Only those functions and parameters that have usage messages should be considered to be user-friendly. These functions and parameters are listed in the parameter $FunctionsWithUsageMessages. Other functions and parameters in this package are generally intended for internal use and should only be used with care if at all as they are not documented, and they may perform unexpected things.
Usage message for NumberOfDiaryFunctionsWithUsageMessages

These functions allow the user to do many things. In addition to this they allow the WorkLife FrameWork™ to be extended and for these extensions to be offered to the WorkLife FrameWork™ user community.
Beyond Mathematica
Initiate many tasks from within Mathematica that you would normally do from other applications
Another face of the WorkLife FrameWork™ is that it is a Mathematica "desktop" that reaches out to the rest of your system.
Opening non-Mathematica files
There are several tools for and approaches to doing this. One is through the OtherFiles Palette. With this, files that are within the OtherFiles folder in a given Diary's directory can be opened in the default application for those files without having to either open the application first or go to the file's directory in your operating system.
Email
Via the Email Palette you can initiate Emails from within a WorkLife FrameWork™ Diary. The email, though created within a Diary, will be sent through your default email client. The original email will remain archived in the originating Diary along with any associated notes and additional Diary entries.
Blogging
From within a Diary you can create Blog entries that you can export to your webspace. Blog entries from within Mathematica—in contrast to conventional Bloggs—can contain all of the usual material that you place in a Mathematica Notebook. Technical Blogging has a wide variety of communication uses. (Technical Blogging is available for Mathematica version 5.1 and later.)
Web Searching
When working within Mathematica you can initiate searches through a wide variety of search engines without having to open a browser first.
RSS Reading
Through the RSSFeedsPalette you can have access to any RSS Feeds that you enjoy keeping track of. When you open an RSS feed from within Mathematica its contents are displayed within a Mathematica notebook. (This functionality requires Mathematica version 5.2 or higher.)
Placing non-Mathematica Imagery into Mathematica Notebooks
With the function PlaceImage you can put images into your WorkLife FrameWork™ Diaries and Notebooks (and also into Blogs created within and generated by the WorkLife FrameWork™).
The original image files can either be from your file system or directly from the Web via a URL.
Track Your Work
The WorkLife FrameWork™ maintains a database of many of the interactions that you have with it. By using this accumulated data you can visualize the items that you interact with--how often, in what order, and in many other ways.
WorkFlows
In the WorkLife FrameWork™ there is a general structure that you can use called a WorkFlow. This is a customized function that, when executed, sets up the WorkLife FrameWork™ to display a particular set of Diaries, Notebooks, and Packages, as well as to open a particular configuration of Palettes. In addition to this a WorkFlow can execute a set of Mathematica commands (in particular it may execute functions from the WorkLife FrameWork™) to initialize a work session or process the contents of a work session in progress.
Notebook Types and Directories
Organization
The WorkLife FrameWork™, organizes your work in Mathematica into Diaries, Work Notebooks, and Package Notebooks. A Diary or group of Diaries sits in a directory that contains directories for the Work Notebooks and Package Notebooks that are associated with it. This is a simple organizational structure, but it becomes very powerful in the WorkLife FrameWork's™ environment.

The Directory Structure of a Diary or an Associated Group of Diaries
Here the name "Diary Directory" could be any name that you have chosen for this particular set of diaries. There is no restriction on the number of Diary directories (or their names) or on the number of Diaries in a given Diary directory.
In the WorkLife FrameWork™, as in all Mathematica work in the FrontEnd, your work is done in Mathematica Notebooks. The architecture of Mathematica is remarkable and unique in that everything that you encounter is an expression even if, at first glance, it does not appear to be one. Prime examples are Mathematica Notebooks themselves. This architecture gives Mathematica the ability to interact with itself programmatically.
Every notebook that you make use of is an expression and, by making use of the right programming tools, the contents of the notebooks can be accessed, tracked, modified, and be made use of in further calculations.
From a very conventional perspective a Mathematica notebook is an arbitrary generalization of a spreadsheet; but, indeed, it is much more than that.
The WorkLife FrameWork™ organizes and adds functionality to Notebooks so that they may be used more efficiently as a resource for these arbitrary generalizations. To do this notebooks are categorized into several types with some useful relationships between them.
While most people have a way of organizing their work on their computer's file system, the WorkLife FrameWork™ provides a simple way to keep track of your work and enforces a very basic structure on how notebooks are stored. This structure, as you will see, still allows full creative license about what sorts of things you can do with notebooks, but makes it much easier to do things that you often avoid, and much simpler to keep track of your various distinct projects. But, in addition to this is opens up many new ways that you will ultimately use Mathematica in your day-to-day work flow.
There are three basic types of notebooks: Diaries, Work Notebooks, and Package Notebooks.
Diaries are the central organizational element of the WorkLife FrameWork™. They are of course notebooks, but with special properties and uses, some of which we will explore shortly. They also automatically exist in a directory structure that organizes them with their associated Notebooks and Packages (as well as Databases and other useful things).
Work Notebooks are traditional Mathematica notebooks, but with some additional internal structure that allows them to be tracked and processed more easily. Also these are automatically placed in a directory that organizes them with their associated Diaries. In the WorkLife FrameWork™, these notebooks are simply referred to as "Notebooks."
Package Notebooks are where you create and organize Mathematica code that you want to reuse and share by exporting the code as a .m file that can be read in using Mathematica's function Needs. This is done automatically upon saving these Package Notebooks using a standard Mathematica mechanism. The Package Notebooks are automatically placed in a directory that organizes them with their associated Diaries.
In addition to these three basic notebook types there are other elements that we will discuss later including Databases, Blogs, Tracking Notebooks and other interesting tools.
Each time you choose a directory and create a Diary in it with the WorkLife FrameWork™, that Diary's directory is populated with several subdirectories:
Notebooks
The Work Notebooks are located here. In addition, there is a subdirectory to the Notebooks directory called Scratch. In here are Scratch Notebooks. Often when working in Mathematica, even though you are writing things carefully in a Notebook, you will want to do some quick free form calculations to figure various things out, just as you would with a spare pad of paper while writing something in a more organized fashion. Scratch Notebooks can be created for this purpose (by using the New Scratch button on the Notebooks Palette) and will be automatically stored in the Scratch subdirectory.
Packages
The Package Notebooks are located here.
OtherFiles
Any other files that are relevant to your set of diaries and their associated notebooks are located here. These might be text documents, various types of data files, image files, any other files that are intended to be opened by other applications, or any files other than Mathematica notebooks that are of importance to the work of the particular set of diaries in the containing directory.
Databases
WorkLife FrameWork™ Databases that you have created are located here.
Blogs
Blogs associated with the Diaries in the containing directory are located here.
Other Directories that depend on actions taken on or within a diary...
There may be other directories within a Diary's directory. Whereas all of the preceding directories are always present (and created automatically when a new Diary is created) there are several other directories that might be created if particular actions are taken.
Again, the schematic illustration of the directory structure of a set of Diaries shows how this is arranged:
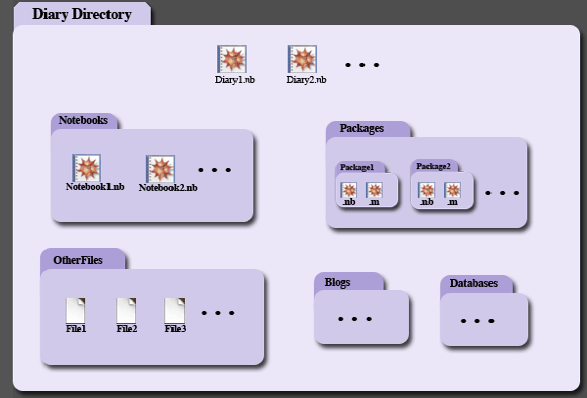
The Directory Structure of a Diary or an Associated Group of Diaries
Simple Diary Usage
Opening a Diary: The Directory Browser
For the buttons and executable commands that are described n this section to work it is assumed that you have installed the WorkLife FrameWork™ and have loaded it. This can be done either from the Load WorkLife Framework button on the supplied palette, by executing the command Needs["Diary`Diary`"], or by clicking on the following button:
To create a new Diary first choose a directory to place it in. There are several ways to do this. Starting from scratch, you find a directory by using the Directory Browser which can be opened by executing

or by clicking on the Choose Directory button in the Diary Access palette or the Diary List palette. The Directory Browser looks like
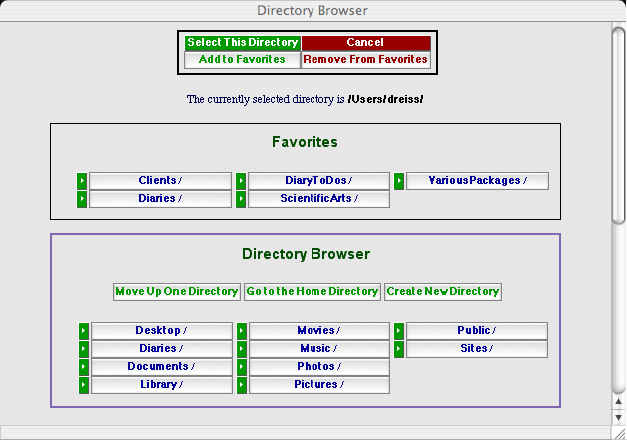
The Directory Browser
In the Directory Browser the current directory that you are in is displayed in the text line at the top that says "The currently selected directory is..."
Within the box titled "Directory Browser" are listed pairs of buttons (each consists of a button to the left of an associated button with a directory name on it) that show all of the subdirectories that are contained in the currently selected directory. button to the left of an associated button with a directory name on it) that show all of the subdirectories that are contained in the currently selected directory.
For these pairs of buttons,the button with text on it moves Directory Browser to the subdirectory that is named on the button. When clicked on, the text line at the top that says "The currently selected directory is..." is refreshed to reflect the new currently selected directory, and the buttons in the Directory Browser box also refresh to show the subdirectories of the new currently selected directory.
If instead of clicking on the button with text on it, you click on the button that looks like you will select that subdirectory directly and the Directory Browser window will close. When the Directory Browser window closes, if the Diary List Palette is open, it will update to show the Diaries that are in the newly selected directory. If the Diary List Palette is not open it will be opened automatically and show the Diaries that are in the newly selected directory. you will select that subdirectory directly and the Directory Browser window will close. When the Directory Browser window closes, if the Diary List Palette is open, it will update to show the Diaries that are in the newly selected directory. If the Diary List Palette is not open it will be opened automatically and show the Diaries that are in the newly selected directory.
Alternatively, rather than clicking on a button, you can select the currently selected directory by clicking on the Select this Directory button. Again you will select that directory and the Directory Browser window will close and the Diary List Palette will either update if it is open or be opened if it is not currently open. button, you can select the currently selected directory by clicking on the Select this Directory button. Again you will select that directory and the Directory Browser window will close and the Diary List Palette will either update if it is open or be opened if it is not currently open.
At any point—when Directory Browser window is open—you can click on the Add to Favorites button to add the currently selected directory to the Favorites list. (Or, you can use the Remove From Favorites button to remove it from that list if it is currently listed there.)
At any time, if you click on the Cancel button, the Directory Browser window will close and you will return to the state—and directory—you were at before the Directory Browser window was first opened.
Opening a Diary: Adding a Volume to the Directory Browser
You use the Directory Browser to navigate around the directories of your file system to find a directory to select for opening Diaries from or creating Diaries within. However, if you have multiple disk drives and/or multiple partitions of your drives it is sometimes laborious to navigate from one drive to another using the "Move Up One Directory" and the other buttons on the Directory Browser.
On Macintosh OS X you can, in fact, move continuously from one disk or partition to another. By clicking on Move Up One Directory repeatedly you will eventually get to the root directory called "/". Then, within this directory you will see listed a directory called "Volumes." In this directory you will see all of your disks and partitions. Then choosing any one of these by clicking on the button with its name on it will place you in that disk or partition at its root level. You can then click on the "Add to Favorites" button to add it to your favorites area. In this way you can easily navigate to that disk or partition in the future.
On Windows the process is slightly different because you cannot continuously navigate from one disk or partition to another in the say way as on OS X. In this case you will need to add the drives associated with the drive or partition directly to your Favorites area using an undocumented function from A WorkLife FrameWork. This function is called AddDirectoryFavorite.
AddDirectoryFavorite is not yet documented, but it is publicly available. It is one of the many functions and parameters that will eventually be documented (about 600 out of 1200 exposed functions and parameters total), but the philosophy with the product has been to expose as many functions and parameters as possible. This lets me, and ultimately the user, write add-ons and applications with the product that can be of use.
Now, to add, say, and E drive to the Favorites area of the Directory Browser you would simply execute:

Of course you should have loaded A WorkLife FrameWork prior to executing this.
Of course you might want, instead, to use AddDirectoryFavorite to place a higher level directory in your Favorites field. But once you have executed AddDirectoryFavorite["E:"], for example, you can navigate to the directories you prefer using the Directory Browser and place them in the favorites field by using the Add to Favorites button. Then, if you wish, you can go to the low level directories "E:" and delete it from the Favorites field using the Remove from Favorites button.
On Macintosh OS X you can also use AddDirectoryFavorite to add a drive directly. Suppose you have a drive called "OtherDrive." Then you would add that drive to the Favorites field of the Directory Browser by executing

Opening a Diary: An Existing Diary
For the buttons and executable commands that are described n this section to work it is assumed that you have installed the WorkLife FrameWork™ and have loaded it. This can be done either from the Load WorkLife Framework button on the supplied palette, by executing the command Needs["Diary`Diary`"], or by clicking on the following button:
Once a directory has been chosen (either by using the associated button or the Select this Directory button , the Diary List Palette will list the Diaries in that directory. button or the Select this Directory button , the Diary List Palette will list the Diaries in that directory.
From the Diary List Palette you can set a Diary to be the current diary. When you do so, the current Diary directory is automatically set to be the directory that the Diary is within, and all of its associated Notebooks, Packages, OtherFiles, and so on are displayed in the various palettes that provide access to them (including the Notebooks Palette, Packages Palette, OtherFiles Palette, Favorites & Recent Palette,...).
Opening a Diary: Creating a New Diary
For the buttons and executable commands that are described n this section to work it is assumed that you have installed the WorkLife FrameWork™ and have loaded it. This can be done either from the Load WorkLife Framework button on the supplied palette, by executing the command Needs["Diary`Diary`"], or by clicking on the following button:
Once a directory has been chosen, you can use the New Diary button in the Diary List palette or the Diary Access Palette to open up the dialog to create a new Diary.

This opens up a dialog window to create a New Diary. The New Diary Dialog looks like:
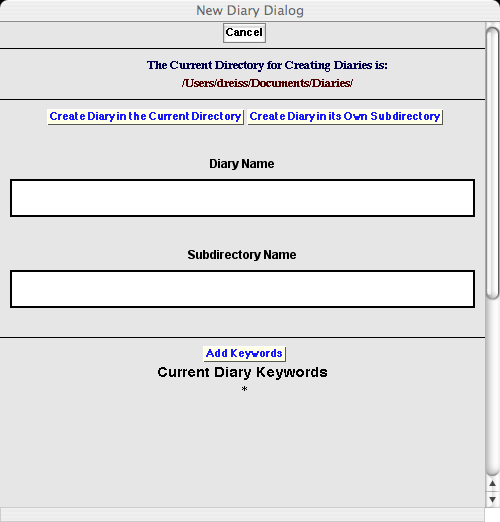
An Example of the New Diary Dialog
At the top of this dialog is information on the current Diary directory.
If you enter a name in the Diary Name field and click on Create Diary in the Current Directory, then a new Diary with that name will be created there and that Diary will open and become the current Diary. (In this case anything typed into the Subdirectory Name field will be ignored.)
If, instead, you enter a name in the Diary Name field and a subdirectory name in the Subdirectory Name field and click on Create Diary in its own Subdirectory, then a new Diary with that name will be created in a subdirectory of the current directory. The new Diary will open and become the current Diary and the new subdirectory will become the current Diary's directory. (If no name is entered in the Subdirectory Name field an error message will be returned if you click on Create Diary in its own Directory,)
Working in a Diary
By making use of WorkLife FrameWork™ Diaries along with their associated Notebooks, Packages, and other elements you can do an enormous variety of things. In the following sections we show the basic architecture and just some of the very basic uses of a Diary.
Anatomy of a Diary
For the buttons and executable commands that are described n this section to work it is assumed that you have installed the WorkLife FrameWork™ and have loaded it. This can be done either from the Load WorkLife Framework button on the supplied palette, by executing the command Needs["Diary`Diary`"], or by clicking on the following button:
A diary consists of
A top Toolbar (called the TopToolbar)
A Title
A "Created on" cell
A number of Default Code Cells
A variety of user-created contents
A bottom Toolbar (called the EntryToolbar)
An illustrative example of what some aspects of a Diary Notebook look like can be seen by clicking the following button:
The TopToolbar looks like

The Top Toolbar of a Diary
These buttons have the following function:

This button sends you to the Bottom of the Diary

This button opens the WorkLife Tools Palette

If a Diary other than the Diary that contains this Toolbar is the current Diary, then clicking on this button will designate this Diary as the current Diary.

This Saves the Diary. It also makes the Diary the current Diary. The process of saving a diary also involves processing the Diary's cells to bring them up-to-date. An alert dialog appears as the Diary is being saved.

This saves and Closes the Diary. It also makes the Diary the current Diary. The process of saving a diary also involves processing the Diary's cells to bring them up-to-date. An alert dialog appears as the Diary is being saved.

This Password Protects the Diary. To un-password protect the Diary you will need to supply the original password that you entered to password protect it. When password protected the Diary will show an input field for the password and a button to click to reconsititute the Diary if the password is correct.

This opens the Diary's Directory in the file system of your computer.

This creates a backup of the Diary.

This shows a table giving information on and access to the backups of the Diary.

This hides the table giving information on and access to the backups of the Diary if it is present.
The BottomToolbar (or EntryToolbar) looks like

The Bottom Toolbar (or EntryToolbar) of a Diary
These buttons have the following function:

This button toggles the Diary Entry Palette open and closed.

The New Heading button places a new Section cell at the end of the Diary. If the Diary is the topmost window then it is brought to the top. If the Diary is not open then it is opened.

The Subsection button places a new Subsection cell at the end of the Diary. If the Diary is the topmost window then it is brought to the top. If the Diary is not open then it is opened.

The Subsubsection button places a new Subsubsection cell at the end of the Diary. If the Diary is the topmost window then it is brought to the top. If the Diary is not open then it is opened.

The Text button places a new Text cell at the end of the Diary. If the Diary is the topmost window then it is brought to the top. If the Diary is not open then it is opened.

The Note button places a new Note cell at the end of the Diary. If the Diary is the topmost window then it is brought to the top. If the Diary is not open then it is opened.

The Input button places a new Input cell at the end of the Diary. If the Diary is the topmost window then it is brought to the top. If the Diary is not open then it is opened.

The New ToDo button opens the ToDoEntryDialog shown below. When filled out and one of the buttons labeled 1, 2, 3, 4, 5, 6 is clicked a new ToDo will be created at the end of the current Diary notebook with the indicated "priority." The button Select Date opens a calendar dialog that allows you to chose a specific Due Date for the ToDo. The buttons Hour, Minutes and AM/PM each open drop down menus to allow you to chose the time of day the ToDo is Due. The text field labeled Time Estimate allows you to input how long you expect the ToDo to take. All of these entries are optional.
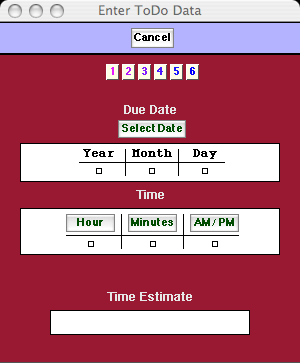
The ToDo entry Dialog

This button sends you to the Top of the Diary

This button toggles the WorkLife Tools Palette open and closed.

If a Diary other than the Diary that contains this Toolbar is the current Diary, then clicking on this button will designate this Diary as the current Diary.

This Saves the Diary. It also makes the Diary the current Diary. The process of saving a diary also involves processing the Diary's cells to bring them up-to-date. An alert dialog appears as the Diary is being saved.

This Backups the Diary. It also makes the Diary the current Diary. An alert dialog appears as the Diary is being backed up.

This saves and Closes the Diary. It also makes the Diary the current Diary. The process of saving a diary also involves processing the Diary's cells to bring them up-to-date. An alert dialog appears as the Diary is being saved.

This button toggles the Formatting Palette open and closed.
Entering Material in a Diary
For the buttons and executable commands that are described n this section to work it is assumed that you have installed the WorkLife FrameWork™ and have loaded it. This can be done either from the Load WorkLife Framework button on the supplied palette, by executing the command Needs["Diary`Diary`"], or by clicking on the following button:
The standard way to enter simple material into a Diary is through the Diary Entry Palette or the EntryToolbar. When you use the various buttons in these objects (such as the New Heading, Subsection, Subsubsection, Text, and Input buttons), new cells of the indicated types are created in the current Diary that have embedded information that allows the WorkLife FrameWork™ to keep track of the material and perform various operations for you with its tools.
Although the Diary Entry Palette contains a small number of possible CellTypes, these are often sufficient for material that you would want to put into a diary. You can change the list of CellTypes in the Diary Entry Palette though the AddCellStylesToDiaryEntryPalette and DeleteCellStylesFromDiaryEntryPalette functions.
There are quite a few palettes in the WorkLife FrameWork™ that allow you to add more sophisticated material into a Diary, including ToDos, automatically executed default code, Blog Entries, various formatting constructs, data to be processed, and many other entities. Much of this is also user customizable and extendable.
Saving or Closing a Diary
For the buttons and executable commands that are described n this section to work it is assumed that you have installed the WorkLife FrameWork™ and have loaded it. This can be done either from the Load WorkLife Framework button on the supplied palette, by executing the command Needs["Diary`Diary`"], or by clicking on the following button:
The standard way to save or close a diary is through the Save or Close buttons (or the Save Diary or Close Diary buttons) either in the Diary's Top or Bottom Toolbars or from within the Diary Access Palette. While the conventional menu commands (or their keyboard equivalents) for saving and closing a notebook file will still work with Diaries, the use of the Save or Close buttons calls on the WorkLife FrameWork™ to process the contents of the Diary in a way that allows much of the functionality of the WorkLife FrameWork™ to be enabled.
When a Diary is saved or closed through the Save or Close buttons a Alert Dialog appears while the processing is taking place. During this time you cannot interact with your notebooks. The amount of time this takes depends on the size of your Diary.
Backing up a Diary
A backup of a Diary can be created by clicking on the Backup button on either the diary's Top or Bottom Toolbar. This backup will reside in the Diary's directory and will have a name that is the same as the Diary's name along with the characters "BU" and an integer time value appended. These backup notebooks do not appear on the various Palettes (such as the Diary List Palette, The Favorites & Recent Palette, and so on...).
Entering More Sophisticated Material in a Diary
For the buttons and executable commands that are described n this section to work it is assumed that you have installed the WorkLife FrameWork™ and have loaded it. This can be done either from the Load WorkLife Framework button on the supplied palette, by executing the command Needs["Diary`Diary`"], or by clicking on the following button:
There are several structured ways to add material to a diary in a way that is different than adding simple textual cells.
Adding a ToDo
By using the ToDos Palette you can add a ToDo to the current Diary. While the name "ToDo" is evocative of something that acts as a reminder, a ToDo need not be used for just that task.
In effect at ToDo is an accessible element (a specialized Text Cell) that has a "Priority" number associated with it. ToDos can be easily visualized from a Diary by using the functionality of the ToDos Palette.
A ToDo can be removed from the set of cells assigned as ToDos within a diary, while still having the Diary retain a memory of the ToDo and its history (by marking it "Done").
Inserting Computation Data
Through making use of the Computations Palette you can effectively make a Diary an arbitrary generalization of a spreadsheet. This generalization can be as structured or as free form as you wish.
Creating a Blog Entry
Blog entries are generally composed within a Diary. These are then automatically exported to a full blog structure that can be uploaded to a website. These blog entries, in contrast to all conventional blogs, support the full typesetting and graphical elements of Mathematica within your blog by internally using Mathematica's HTMLSave function.
Creating an Email
Emails can be composed within a WorkLife FrameWork™ Diary and then sent through your system's default email client. An email is composed in a Diary and is bounded by its own upper and lower Toolbar.
Creating an Essay
Essays are one way to create exportable Notebook content within a Diary. In fact both Emails and Blog Entries are special cases of Essays. However, Essays have no restriction as to what can appear in them. With a simple button click a given essay can be exported to a Notebook which can then be separately saved and edited. The original of the essay remains within the Diary where it was composed.
In a sense, an Essay is a Notebook within a Diary Notebook. Essays can also be created within a conventional Notebook, but the default behavior for the Essay Palette is to create any new Essay within the current Diary.
Tagging Cells in Arbitrary Ways
Through the Tagging Palette you can easily assign arbitrary Tags to the various cells in a Diary, to create new Cells with those Tags, to navigate Cells with given Tags, to show and hide such cells, to copy all Cells with a given tag into a newly created Notebook, and other functions. In this way you can do a very wide variety of things with the contents of a Diary or a Notebook. At a very basic level it turns a Diary or Notebook into an object whose contents can be viewed and extracted in intricate ways. In a task as simple as taking notes, the use of various sensibly defined tags will allow you to extract, as notebooks, material from your notes to place in other contexts. It is a creative and functional process of great power.
Copyright ©, 2005→2009, Scientific Arts, LLC
|