|
Essay Palette
The Palette
For the buttons and executable commands that are described n this section to work it is assumed that you have installed A WorkLife FrameWork™ and have loaded it. This can be done either from the Load WorkLife Framework button on the supplied palette, by executing the command Needs["Diary`Diary`"], or by clicking on the following button:
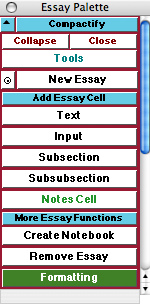
By clicking on the on the ◂ button to the left of Essay on the WorkLife Tools Palette, you will open the Essay Palette. You can also open the Essay Palette by executing:

or by clicking the Essay button on the All Palettes Palette.

The Essay Palette
The Palette Buttons
For the buttons and executable commands that are described n this section to work it is assumed that you have installed A WorkLife FrameWork™ and have loaded it. This can be done either from the Load WorkLife Framework button on the supplied palette, by executing the command Needs["Diary`Diary`"], or by clicking on the following button:

The New Essay button creates a new essay at the end of the current Diary notebook. The button with the "⊙" on it places the essay near the current insertion point in the current Diary notebook.

Opens and closes the Add Essay Cell sub-palette which includes the five buttons that follow.

Adds a new Text cell within the essay. The insertion point must be within the essay. The new Text cell is created below the insertion point.

Adds a new Input cell within the essay. The insertion point must be within the essay. The new Input cell is created below the insertion point.

Adds a new Subsection cell within the essay. The insertion point must be within the essay. The new Subsection cell is created below the insertion point.

Adds a new Subsubsection cell within the essay. The insertion point must be within the essay. The new Subsubsection cell is created below the insertion point.

Adds a new Notes Cell within the essay. The insertion point must be within the essay. The new Notes cell is created below the insertion point. When the Create Notebook button (described below) is used, Notes Cells are not included in the resulting notebook.

Opens and closes the More Essay Functions sub-palette which includes the two buttons that follow.

This button creates a new notebook containing just the content of the essay. The insertion point must be within the essay. The resulting notebook does not contain any of the essay's Notes Cells

Removes the essay. The insertion point must be within the essay. Removed essays are copied to the clipboard. The clipboard will be overwritten whenever something else is copied to it.

Opens the Formatting Palette. The Formatting palette can also be opened programmatically by executing the command,

Copyright ©, 2005→2009 Scientific Arts, LLC. All rights reserved.
|