Computations
Active Notebooks
Much of the content and functionality of the WorkLife FrameWork™ is based on the fact that Notebooks in Mathematica are expressions and, because of that, can be manipulated in endless ways. One of these ways is to place information in a Notebook and then extract it, perform a computation on it, and then place the result back in the Notebook (or to do even more sophisticated things with it in the course of performing the computation). This is what the Computations Palette—and the suite of functions that support it—is designed to do.
There are two levels of use of the Computations Palette: a basic level and an expanded one. We describe each of these in turn in the following after reviewing the Computation Palette itself. In this context we also describe the direct use of the functions that perform the calculations for the Computations Palette.
For each of these uses of the Computation Palette, the effect is to have a notebook become, in essence, an arbitrary generalization of a spreadsheet.
The Computation Palette
For the buttons and executable commands that are described n this section to work it is assumed that you have installed the WorkLife FrameWork™ and have loaded it. This can be done either from the Load WorkLife Framework button on the supplied palette, by executing the command Needs["Diary`Diary`"], or by clicking on the following button:
The Palette
By clicking on the on the ◂ button to the left of Computations on the WorkLife Tools Palette you will open the Computation Palette. You can also open the Computation Palette by executing

or by clicking the Computations button on the All Palettes Palette.
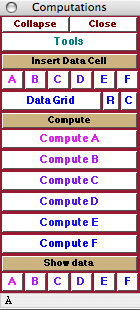
The Computation Palette
The Palette Buttons

This is a heading button for the two sets of buttons that follow which have to do with adding Data Cells to the current Diary notebook.

Clicking on any of these buttons inserts a Data Cell of the indicated label at the end of the current Diary notebook.
A data cell is formatted as follows (for the case of the label A):

where the place holder, □, is ready for the insertion of data.

The Data Grid button opens up a dialog that lets you choose the dimensions of a Data Grid to be placed as a Data Cell at the end of the current Diary notebook. The Data Grid dialog looks like:
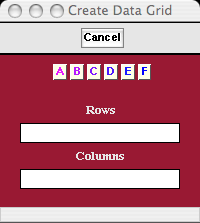
The Data Grid dialog
In the Data Grid dialog the number of rows and columns (each an integer) are input and then by clicking on one of the buttons labeled A, B, C, D, E, F, a blank Data Grid is placed at the end of the current Diary notebook as a computation cell of the chosen label.
Here is an example of a 3×4 Data Grid for the Computation label B:
When your insertion point is within a Data Grid you can Tab through the unfilled placeholders □.
The buttons R and C, when clicked, each add respectively one row or one column to the data grid at the insertion point in the data grid.

This is a heading button for the buttons that follow which have to do with performing computations with the data cells from the current Diary notebook.
Note that the names of these cells are the default generic ones. On a Diary by Diary basis these names can be changed by defining values of the function ComputationCellOperatorName. This is illustrated below.

Clicking on this button causes the computation defined by ComputationCellOperator["A"] to be performed on the data contained in computation cells with label "A" in the current Diary notebook. The default value of each of the ComputationCellOperators is just (#&), which returns the data contained in the computation cells with the given label. (See below in the section "Diary Computations: Basic Use" for details on the data structure that is used.)
If we had made the definition

then the button would look like

And an example of a function that would add together the contents of the A data cells would be


Causes the computation defined by ComputationCellOperator["B"] to be performed on the data contained in computation cells with label "B" in the current Diary notebook. See the discussion above for the first Computation button.

Causes the computation defined by ComputationCellOperator["C"] to be performed on the data contained in computation cells with label "C" in the current Diary notebook. See the discussion above for the first Computation button.

Causes the computation defined by ComputationCellOperator["D"] to be performed on the data contained in computation cells with label "D" in the current Diary notebook. See the discussion above for the first Computation button.

Causes the computation defined by ComputationCellOperator["E"] to be performed on the data contained in computation cells with label "E" in the current Diary notebook. See the discussion above for the first Computation button.

Causes the computation defined by ComputationCellOperator["F"] to be performed on the data contained in computation cells with label "F" in the current Diary notebook. See the discussion above for the first Computation button.

This is a heading button for the buttons that follow which are used to copy the data cells from the current Diary notebook and display them in a new Notebook for inspection.

Each of these buttons opens up a new notebook containing the data cells of the indicated label from the current Diary notebook.
Diary Computations: Basic Use
For the buttons and executable commands that are described n this section to work it is assumed that you have installed the WorkLife FrameWork™ and have loaded it. This can be done either from the Load WorkLife Framework button on the supplied palette, by executing the command Needs["Diary`Diary`"], or by clicking on the following button:
Introduction
The basic use of Diary Computations takes advantage of the default structure of the Computations Palette. With this you can place in a Diary up to 6 types of data and perform computations on these data in 6 different ways: each of the 6 types of user-defined computations can be applied to the corresponding type of data, but not to the others. We showed some examples of how this is done in the preceding section that describes the individual buttons in the Computations Palette. We will review the process here once again.
By using the right definition of the ComputationCellOperator for the computation type that you are doing (for example, computations on the Data Cells labeled by A) you can perform arbitrary computations with the data from the Cells of that type in the current Diary.
In fact, more than just the data that you entered in the Data Cells is available. The data structure that is used is easiest to describe with an example. Assume that you have placed three Data Cells in your current Diary that look as follows


The default value of the ComputationCellOperator for Data Cells labeled by A, is,


This is designed to simply return that data structure that the computation acts upon.
Here is what is placed in your diary if the Compute A button is clicked on with this value of the ComputationCellOperator:

It is easier to see what's in this list by presenting it in a Tabular form:
| Computation Data Structure Example |
| Data |
Cell Tags |
Tagging Rules |
| x |
{DiaryDate[{2006, 4, 18, 11, 52, 22.387376}],ComputationCell,ComputationCellA} |
{GUIDTag[161192532871149833615030202322400963367]} |
| y |
{DiaryDate[{2006, 4, 18, 11, 52, 23.015436}],ComputationCell,ComputationCellA} |
{GUIDTag[224426542271711231157568266716850214734]} |
| z |
{DiaryDate[{2006, 4, 18, 11, 52, 32.840796}],ComputationCell,ComputationCellA} |
{GUIDTag[219439989987201520981462330690907739495]} |
|
First Column
The first column in the list is the data from the Data Cells given in the order that they appear in the Diary. The list of this information would be accessed by using the construct #1[[All,1]] in the pure function that is given for the ComputationCellOperator. For example, if you just wanted a list of the data in the Data Cells labeled by A, from the current Diary notebook you would define


And then what is placed in your diary if the Compute A button is clicked would the list of data values from the Data Cells:

When you extract the data from the Data Cells in this way you have a list to perform further processing on. Here are two simple examples.
Summing the data in the Data Cells


This gives,

Multiplying the data in the Data Cells (note the use of Apply in its @@ form and the () brackets)


This gives,

Here the mean divided by the standard deviation is computed:
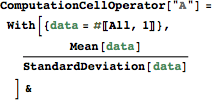

This gives,

Second Column
The second column in the list shows the CellTags from the respective Data Cells.
To gather the data within this second column you simply use the same sort of construct that you used for the first column, but change the column index from 1 to 2. So, to return the second column of data from the data structure for Data Cells labeled by A, from the current Diary notebook would involve the following definition for the ComputationCellOperator:


This is a list of the CellTags from each of the Data Cells in the current Diary notebook.
One important tag that appears in each of these Cells is the DiaryDate tag. This gives the time stamp for when the given Data Cell was created. The way to extract a list of the Date information from the DiaryDate tags is to use the construct
Function[x,Cases[x, y_?DiaryDateQ:→ DateFromDiaryDateTag[y]]]/@#[[All,2]]
in the pure function that is given for the ComputationCellOperator.
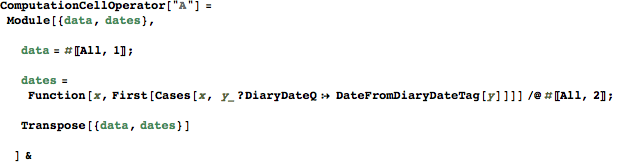
A simple example of this is to choose this as the pure function for ComputationCellOperator["A"]:


Then then what is placed in your diary if the Compute A button is clicked would be the dates when the Data Cells were created as in the following

If you wanted this to be automatically changed into a Textual date you could do the following (using a module to keep from having things look too messy:
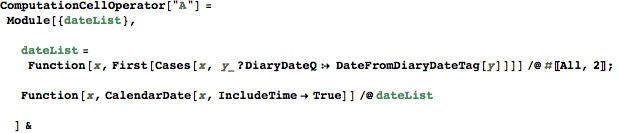

Then then what is placed in your diary if the Compute A button is clicked would be a textual version the calendar dates when the Data Cells were created as in the following:

Third Column
Embedded within cells, in addition to CellTags, there may be TaggingRules. The third column of data given in the data structure used by Computations consists of the list of Tagging rules. Tagging rules are a way of embedding extra information within a Cell that you might wish to use when processing the Cell. Although you should not remove any of the TaggingRules placed in the cell by the WorkLife FrameWork™, you can put your own material there using the function AddCellTaggingRule.
Combining Columns
Combining columns from the data structure that Computations makes use of is just a matter of grabbing the material from each column separately following the approaches outlined in the preceding three sections and designing the computation that you want to perform on the resulting lists.
As a simple example of this, here we produce a list of pairs—the first in each is the data from a Data Cell and the second is the Date from the Data Cell's DiaryDate tag.

Then this is what is placed in your diary if the Compute A button is clicked:

The Function ComputeDiaryNotebook
When you click on a button such as the Compute A button, the function behind the scenes that is doing the work is called ComputeDiaryNotebook.
ComputeDiaryNotebook[computationCellTagSuffix,style,computationFunction] takes the contents of all cells in the $CurrentDiaryNotebook that have the cell tag "ComputationCell"<>computationCellTagSuffix, applies the function computationFunction to their data, and writes the result to a cell of cell style "style." For each cell, the contribution to the data that is used is a list containing three elements. The first element is what explicitly appears in the contents of the cell The second element is a list of the CellTags of that Cell. Included in the list of CellTags generally is the DiaryDate tag, as well as possibly others. The third element is a list of the TaggingRules of that Cell.
The form ComputeDiaryNotebook[{compCellTagSuffices...},style,computationFunction] takes the data from multiple computation cell types given through the list {compCellTagSuffices...}. The computationFunction should be a function of Length[{compCellTagSuffices...}] variables.
Also note that, if computationCellTagSuffix contains white space, the white space will be automatically removed before use.
Usage Message for ComputeDiaryNotebook
With the function ComputeDiaryNotebook you can perform the same computations on the data in the Diary with a function call. For example, computing the sum of the data in the Data Cells is done with the following.

This, as expected, results in the following Cell appearing in the current Diary:

If, as an alternative, you executed

then the following Input Cell appears in the current Diary:

You may wish, however to have the result of a Computation of the Diary appear in a different notebook than the Diary from which the Data is obtained. To do this simply make use of the form
ComputeDiaryNotebook[nb, computationCellTagSuffix,style,computationFunction]
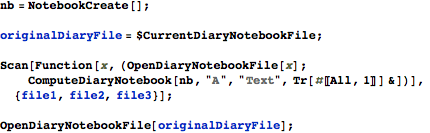
where nb is the NotebookObject of the notebook where you want the result to appear. So if, for example, you were to create a new notebook with

then the following would place the result of the computation (which is to sum up the data from the Data Cells with the Label A in the current Diary) into the notebook nb.

Strategies with ComputeDiaryNotebook
The function ComputeDiaryNotebook only takes the data from the Data Cells in the current Diary. If the current Diary is not open then ComputeDiaryNotebook opens it and extracts the data needed for the computation.
If you want to process several Diaries with ComputeDiaryNotebook and place the results in a separate Notebook, nb, then you can use the function OpenDiaryNotebookFile to open the Diaries to perform the computations.
For example, if you have three Diaries with filenames, file1, file2, and file3, here is a bit of code to do this task.
Diary Computations: More General Use
For the buttons and executable commands that are described n this section to work it is assumed that you have installed the WorkLife FrameWork™ and have loaded it. This can be done either from the Load WorkLife Framework button on the supplied palette, by executing the command Needs["Diary`Diary`"], or by clicking on the following button:
The function ComputeDiaryNotebook can take a more generalized form:
ComputeDiaryNotebook[{compCellTagSuffices...},style,computationFunction]
In this form, the labels (called the compCellTagSuffices in the template above) off multiple Data Cells can be used rather than just one as in the examples in the preceding section. For this to be useful, the computation function should be a Pure Function of multiple arguments--in contrast to the single argument version that we used earlier.
To see an example of this we assume that the current Diary has two types of Data Cells, A and B, and they are as follows:


Now perform a Computation on these cells to add their data all together. The computation function that would do this is

Note the presence of both #1 and #2 in the pure function. Another way to write this would be

Using this function in ComputeDiaryNotebook with multiple Data Cell labels is straightforward. Here is an example:

The result of executing this expression is for the following Cell to appear in the current Diary:

A Data Cell's label can also be repeated if you wish. This computes the sum of the B Cells' data and adds it to itself.

The result of executing this expression is for the following Cell to appear in the current Diary:

This is another example where the sum of the data in the A Cells is raised to the power of the sum of the data in the B Cells:

The result of executing this expression is for the following Cell to appear in the current Diary:

The role of the Data Cells' data can be reversed without changing the Pure Function by simply exchanging the A and B labels as in:

The result of executing this expression is for the following Cell to appear in the current Diary:

Clearly this process is broadly extendable.
Copyright ©, 2005→2009, Scientific Arts, LLC
|