Blogging
Introduction
In the following subsections we describe the blogging tools in the WorkLife FrameWork™. First we review the elements of the Blog Tools Palette and then describe in more detail the process of setting up a blog from within Mathematica and the writing and publishing of blog entries.
The Blog Tools Palette
For the buttons and executable commands that are described n this section to work it is assumed that you have installed the WorkLife FrameWork™ and have loaded it. This can be done either from the Load WorkLife Framework button on the supplied palette, by executing the command Needs["Diary`Diary`"], or by clicking on the following button:
Introduction
A summary of the Blog Tools palette follows in the next two sections titled "The Palette" and "The Palette Buttons." The material here is described in greater detail in the sections subsequent to those.
The Palette
By clicking on the on the Blogging button on the All Palettes Palette you will open the Blog Palette. You can also open the Blog Palette by executing

This palette provides tools for the creation, entry into, and manipulation of Blogs created from within Mathematica.
Other essential blogging functionality is provided by means of the buttons in the Blog toolbar which appears at the top of each Blog entry.

The Blog Tools Palette
The Palette Buttons

The Select Template button opens a dialog which allows you to select an HTML template to use in a particular Blog. This dialog looks like:
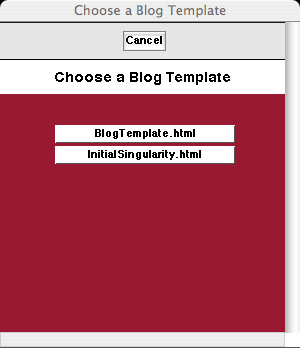
The Choose Blog Template Dialog
In this example there are two templates to choose from, the default BlogTemplate.html and a user-supplied InitialSingularity.html. To apply a template to a given Blog, the insertion point must be within a Blog entry that resides in a Diary.

This button opens up a dialog for creating a New Blog. The sequence of steps that you then follow is described below in the section on "Setting up a Blog."

Opens a dialog to create a New Blog Entry in the current Diary notebook. The dialog allows you to choose which Blog the new entry will be assigned to and to give the entry a title. The new blog entry will be placed at the end of the current Diary notebook. See the section below on "Creating and Editing a Blog Entry" for further details.

The button Update Blog Info first opens a dialog allowing you to choose a Blog. When you click on the Blog's button in this dialog a second dialog opens allowing you to change the Blog's information as in the Change Blog Information dialog for the New Blog button above.

Each blog has a list of links that it contains and displays on a side bar. To add a link to a Blog's list of links the Add to Links button opens a sequence of dialogs that allows you to do this.

Opens the Mathematica dialog to create a hyperlink for the selected text in the Blog entry. A hyperlink to a web site or resource can be used or a link to a tagged item in the current Blog entry.

Opens and closes the Add Blog Cell sub-palette which includes the six buttons that follow.

Adds a new Text cell below the current insertion point in the current Blog entry. If the insertion point is not within a Blog entry, then an error message is generated.

Adds a new Input cell below the current insertion point in the current Blog entry. If the insertion point is not within a Blog entry, then an error message is generated.

Adds a new Subsection cell below the current insertion point in the current Blog entry. If the insertion point is not within a Blog entry, then an error message is generated.

Adds a new Subsubsection cell below the current insertion point in the current Blog entry. If the insertion point is not within a Blog entry, then an error message is generated.

Adds a new Notes cell below the current insertion point in the current Blog entry. If the insertion point is not within a Blog entry, then an error message is generated. Notes cells are not included in the HTML version of the Blog entry.

The Place Image button opens up a dialog that allows you to choose an image file on file system. This image file is read and its data is converted to a bitmap that is placed in the Blog entry.

Opens and closes the More Blog Functions sub-palette which includes the two buttons that follow.

The Create Notebook button opens up a new notebook containing the contents of the Blog entry. This excludes the toolbar cells and any notes cells.

Removes the Blog entry. The insertion point must be within the Blog entry. Removed Blog entries are copied to the clipboard. The clipboard will be overwritten whenever something else is copied to it.

Opens and closes the Directories sub-palette which includes the three buttons that follow.

Opens up the Blogs Directory which is the subdirectory of the current Diary's directory that contains Blogs that are associated with it.

Opens a dialog to choose a Blog from a list of Blogs associated with the current Diary. When one of these buttons is clicked the associated Blog's Directory is opened.

Opens a dialog to choose a Blog from a list of Blogs associated with the current Diary. When one of these buttons is clicked the HTML Directory associated with this Blog is opened.

Opens the Formatting palette. This can also be opened programmatically by executing:

Setting up a Blog
For the buttons and executable commands that are described n this section to work it is assumed that you have installed the WorkLife FrameWork™ and have loaded it. This can be done either from the Load WorkLife Framework button on the supplied palette, by executing the command Needs["Diary`Diary`"], or by clicking on the following button:
To set up a new Blog you first must have a Diary specified as your current Diary. The new Blog will be created in the Blogs subdirectory of the current Diary's directory.
To create a blog you click on the New Blog button in the Blog Tools Palette and then follow the following sequence of steps.
This button opens up a dialog for creating a New Blog. This dialog looks like:
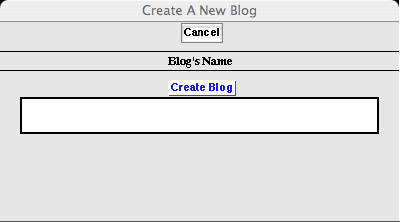
The Create A New Blog Dialog
In this dialog you place the name of the Blog.
When the Create Blog button is clicked the blog is created and a second dialog is opened to add information specific to the newly created blog. This dialog looks like:
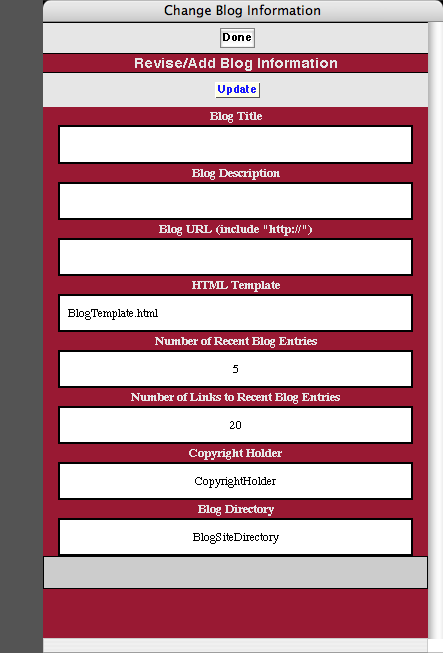
The Change Blog Information Dialog
This dialog has eight input fields:
BlogTitle: The title of the blog. This is what will be used on the blogs web page.
Blog Description: A short description of the blog for use in RSS Feeds and other places.
Blog URL: The home URL of the blog for the creation of hyperlinks back to the front page of the blog.
HTML Template: The HTML Template that will be used for the blog and its entries. This must be one of the templates from the list given from executing:

Number of Recent Blog Entries: This is the number of links to recent blog entries that will be displayed on the Blog's front page. It must be an integer.
Number of Links to Recent Blog Entries: This is the number of recent blog entries that will be displayed on the Blog's front page. It must be an integer. All earlier links will appear on the Blog's Archive page.
Copyright Holder: This is the name of the entity that holds the copyright to the blog. It may be left blank.
Blog Directory: This is the full path to the local directory on your computer where the html source for your blog resides. When a blog entry is "published" it is then automatically copied to this directory. When this happens the original directory is backed up first. This directory must already exist. The published version of the Blog also exists in the Blog's directory.
Adding Links to a Blog
For the buttons and executable commands that are described n this section to work it is assumed that you have installed the WorkLife FrameWork™ and have loaded it. This can be done either from the Load WorkLife Framework button on the supplied palette, by executing the command Needs["Diary`Diary`"], or by clicking on the following button:
The templates that you use for a Blog can have an area where links are displayed, for example on a sidebar. For each Blog this set can be different and you can update it as you wish. To manage these links you use the Add to Links button on the Blog Tools Palette.
To add a link to a Blog's list of links the Add to Links button opens a dialog that allows you to do this. The first dialog that opens up allows you to choose a Blog from those associated with the current Diary. Then, when the Blog is chosen, a second dialog opens that permits you to add a link and to name it.
This second dialog looks like:
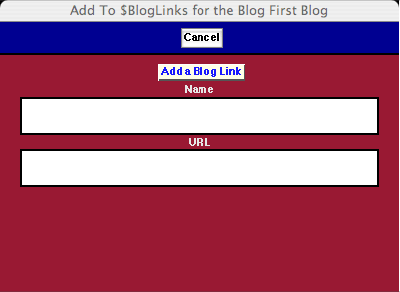
The Add to $BlogLinks Dialog
Creating and Editing a Blog Entry
For the buttons and executable commands that are described n this section to work it is assumed that you have installed the WorkLife FrameWork™ and have loaded it. This can be done either from the Load WorkLife Framework button on the supplied palette, by executing the command Needs["Diary`Diary`"], or by clicking on the following button:
To create a new entry for a Blog first click on the New Blog Entry button in the Blog Tools Palette.
This will open a dialog to create a New Blog Entry in the current Diary notebook (the Diary will open if it is not currently open). The dialog allows you to choose which Blog the new entry will be assigned to and to give the entry a title. The new blog entry will be placed at the end of the current Diary notebook.
The dialog that appears looks like
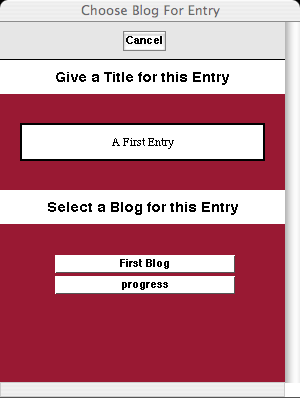
The New Blog Entry Dialog
In this case there are two Blogs that the user has already created in the current Diary's Blogs directory. In the Text field you should specify a title for the Blog entry (this sill appear on the Blog entry's web page posting) and then click on the button representing the Blog that you want this entry to be published in.
If, for example, you type "A First Entry" (without the quotation marks) into the text field (as was done in the illustration above) and then click on the button for the First Blog, the following will be placed at the end of your current Diary.

Blog Name: First Blog
text
A First Entry
text

Before we cover the buttons in the Top and Bottom Toolbars we will go over the different Cells that appear when you first create a Blog entry.
The first (light blue) Cell contains the Blog name. This cell is for informational purposes: it reminds you what Blog you are working on. Recollect that the Blog Name is not the title of the Blog. It is just the name you are referring to the Blog by within the WorkLife FrameWork™. The Blog's title is what will appear within the Blog (you can change the Blog's title using the Update Blog Info button from the Blog Tools Palette). This cell cannot be edited.
The second Cell, with RSS as the Cell Frame Label, is where you place whatever text that you want to appear in the RSS Feed item for the Blog entry. This should be simple plain text without any formatting or equations.
The next Cell, which says "A First Entry," is the title of the Blog entry (the title of a Blog entry is not the same thing as the title of the Blog—it is just the title of the individual entry). You can edit this if you wish, in case you didn't specify it properly when you first created the Blog entry through the dialog.
Following the Cell with the Blog entry's title is where you place the content of the Blog entry. When the Blog entry is first created a simple Text Cell is placed with the word "text" placed in it.
The buttons that appear in the Blog entry's Top and Bottom Toolbars have the following function.
From the Blog entry Top Toolbar

This opens up the Blog Tools Palette

Adds a Notes Cell below the cell where the insertion point is within the Blog Entry

Locks all of the Cells in the Blog entry

Unlocks the Cells in the Blog entry

If any of the Cells in the Blog entry are hidden this unhides them

Hides all of the cells within the Blog entry

Starts Mathematica's Spell checker at the top of the Blog entry

Moves your insertion point to the Bottom of the Blog entry

Opens up a dialog that allows you to select a Blog template for the entry's Blog. This dialog looks like:
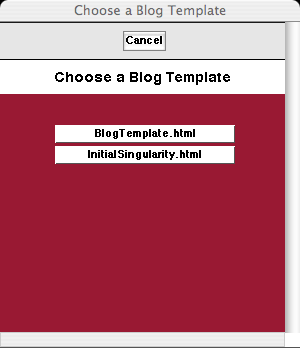
The Choose Blog Template Dialog
In this example there are two templates to choose from. The default BlogTemplate.html and a user-supplied InitialSingularity.html. The Template button on the Blog entry's Top Toolbar automatically chooses the correct Blog to assign the template to.

Saves the Blog entry. This doesn't create an HTML version and correspondingly does not make something that can be viewed from a web browser. However it does make a Notebook form of the entry for archive purposes and also if you wish to later Publish it.

Publishes the Blog entry based on a previously saved version

Both saves and then Publishes the blog entry. This is generally the button that you will use to create your Blog entry.

Each blog has a list of links that it contains and displays on a side bar. To add a link to a blogs list of links the Add to Links button opens a dialog that allows you to do this. The first dialog that opens up allows you to choose a Blog. Then, when the Blog is chosen, a second dialog opens that permits you to add a link and to name it.
This second dialog looks like:
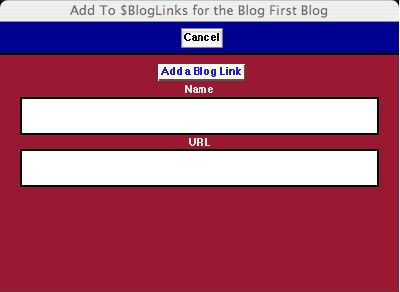
The Add to $BlogLinks Dialog

This goes through the blog entry cell by cell to make sure that all of the cells are properly internally tagged so that they can be processed when you publish the entry. If you place Cells within the blog entry in any way other than through the Blog Tools Palette or the Blog entry's Top or Bottom Toolbar then this will make sure that the cells all "know" that they are in the Blog Entry. (In fact, when you publish the entry using one of the Publish buttons the cells are rechecked at that time and brought properly up to date.)

When a blog posting is published it may contain—at the end of the posting—a link to the notebook version of the blog posting. This button toggles between specifying whether or not such a notebook link be created (and whether the notebook version is created in the blog posting's directory. When the toggle is set to create this link, the cell at the top of the blog posting which has the blog's name ("Blog Name: First Blog" in the example above) will have a small green nb to its left, as shown in the example. This is absent when the toggle is set not to create the notebook link.
From the Blog entry Bottom Toolbar

Adds a Text Cell to the bottom of the Blog Entry.

Adds a Subsection Cell to the bottom of the Blog Entry.

Adds a Subsubsection Cell to the bottom of the Blog Entry.

Adds an Input Cell to the bottom of the Blog Entry.

Adds a Text Cell to the bottom of the Blog Entry. Notes Cells are not published in the web version of the Blog. They are a convenient way for you to place unpublished notes within an Entry in context.

Moves the insertion point to the top of the Blog entry

Toggles the Formatting Palette open and closed.
Publishing a Blog Entry
For the buttons and executable commands that are described n this section to work it is assumed that you have installed the WorkLife FrameWork™ and have loaded it. This can be done either from the Load WorkLife Framework button on the supplied palette, by executing the command Needs["Diary`Diary`"], or by clicking on the following button:
Creating the Blog's HTML
To Publish a Blog entry you click on the Save andPublish button on the Top Toolbar of the given Blog entry. An alert will appear as the entry is being saved and being published.
Remember that to Save a Blog entry is to save a notebook form of the entry within its assigned subdirectory of the Diary's Blogs subdirectory. The HTML web version of the Blog entry is created when the Blog entry is Published.
Several things are automatically created when the Blog entry is Published.
The Blog's front page is updated to include the current version of the Blog entry at its proper reverse-chronological place in the sequence of recent Blog entries.
If the Blog entry is the most recent one, then it is placed at the top of the Blog's front page
The number of recent Blog entries that are displayed on the Blogs front page is set when you first create the Blog. You can change its value by using the Update Blog Info button on the Blog Tools palette.
A "Permalink" version of the Blog entry is created (and is linked to from the Blog's front page).
The list of recent Blog Postings is updated on the Blog's front page..
The RSS Feed for the Blog is updated to include the text from the RSS field of the Blog entry.
Other bookkeeping takes place.
Putting the Blog on the Web
If you click the HTML Directory button on the Blog Tools Palette and click on the Blog's name in the dialog that opens, the directory in which the Blog's HTML code resides will open in your computer's operating system. This directory is called EntriesHTML and resides in the Blog's Directory. (You can go to the Blog's directory by clicking on the Blog's Directory button on the Blog Tools Palette and then choosing the Blog from the resulting dialog.) All of the files in this directory constitute the Blog. If all of the files in this directory (or the directory itself) are placed on a web server (for example, your personal web space assigned to you by your ISP—Internet Service Provider—or on your own domain hosted by a web hosting service) then the Blog will become "live" on the web.
Several strategies can be used to do this, though how to upload the files will depend on what tools you have, or that your ISP or web hosting service provides.
One simple strategy is to copy the files from the Blog's EntriesHTML directory to the directory on your system where you keep the local version of your web site. This is the purpose of the function CopyBlogToWebDirectory.
CopyBlogToWebDirectory[blogName,{webSiteLocalPath, blogWebName}] moves a copy of the blog to a local directory from which you can upload it to a web site. blogName is the name of the Blog. webSiteLocalPath is the full path to the local version of your web site's root directory. blogWebName is the name of the subdirectory of your web site's local root directory in which the Blog resides. All of the arguments of CopyBlogToWebDirectory should be strings. The form CopyBlogToWebDirectory[blogName,{webSiteLocalPath}] assumes that the Blog is to be put into the directory, webSiteLocalPath.
Usage Message for CopyBlogToWebDirectory
Editing Blog Templates
For the buttons and executable commands that are described n this section to work it is assumed that you have installed the WorkLife FrameWork™ and have loaded it. This can be done either from the Load WorkLife Framework button on the supplied palette, by executing the command Needs["Diary`Diary`"], or by clicking on the following button:
Each Blog that you create is converted to its Web/HTML version based on a Template that is either one that is included with the WorkLife FrameWork™ or that you create yourself.
A Blog template can have any structure that you wish it to have, and you can include any material on it that you wish. However, there are a few elements that you need to add to the template so that it automatically includes the material that you enter into the Blog from within Mathematica.
You can create a template from scratch, or you can modify an existing one. The Blog templates are located in the directory given by the parameter $BlogTemplatesDirectory.
In a Blog template there are several strings of characters that specify to the Worklife FrameWork™ where to place the Blog's material. It is therefore quite important to know what these strings are. They are specified in several internal Worklife FrameWork™ parameters which are, in essence, random strings that are used to be replaced by the Blog material that you create in the WorkLife FrameWork™.
The $BlogTitleString tells the Worklife FrameWork™ where to place the title of the Blog.

The $BlogEntryString tells the Worklife FrameWork™ where to place the html code that contains the content of the Blog postings.

The $BlogLinksString tells the Worklife FrameWork™ where to place the html code that contains the set of links that you want to display with the Blog.

The $BlogRecentPostsString tells the Worklife FrameWork™ where to place the html code that contains the set of links to recent Blog posts.

The $BlogCSSString tells the Worklife FrameWork™ what the name of the cascading style sheet file is.

The $BlogDTDString tells the Worklife FrameWork™ what the name of the DTD file is.

The $BlogXMLString tells the Worklife FrameWork™ where to place the link to the automatically generated RSS feed for the Blog.

The $CopyrightYear tells the Worklife FrameWork™ what the year is that a post was written is if you want to automatically include this in a copyright notice for posts.

You will certainly want to have the Blog entries themselves, the list of links that you have included for the Blog, and a list of recent Blog posts included in your template. The parameters given by $BlogCSSString, $BlogDTDString, and $BlogXMLString are necessary parameters for the proper functioning of a template with Mathematica's automatically generated Cascading Style Sheets (created by Mathematica's function HTMLSave). To see how these are placed in a Blog template you can look at the raw html of one of the included Blog templates.
It is easy to see where the parameters given by $BlogEntryString, $BlogLinksString, and $BlogRecentPostsString appear in a Blog template simply by examining a Blog template in a web browser.
The following button should open up one of the default Blog templates in your web browser:
.
In this you will see the values of the three parameters located where the Blog's material will be placed.
Copyright ©, 2005→2009, Scientific Arts, LLC
|