|
Additional Tools Palette
The Palette
For the buttons and executable commands that are described n this section to work it is assumed that you have installed A WorkLife FrameWork™ and have loaded it. This can be done either from the Load WorkLife Framework button on the supplied palette, by executing the command Needs["Diary`Diary`"], or by clicking on the following button:
By clicking on the on the ◂ button to the left of Additional Tools on the WorkLife Tools Palette, you will open the Additional Tools Palette. You can also open the Additional Tools Palette by executing:

or by clicking the Additional Tools button on the All Palettes Palette.
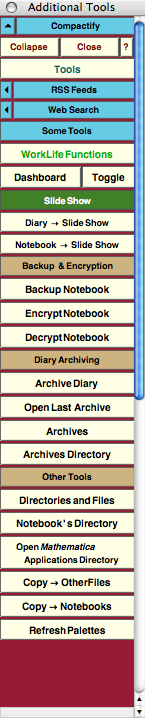
The Additional Tools Palette
The Palette Buttons
For the buttons and executable commands that are described n this section to work it is assumed that you have installed A WorkLife FrameWork™ and have loaded it. This can be done either from the Load WorkLife Framework button on the supplied palette, by executing the command Needs["Diary`Diary`"], or by clicking on the following button:

Opens and closes the RSS Feeds sub-palette. See the documentation for the RSS Feeds Palette for details. By clicking on the on the ◂ button the RSS Feeds Palette will open.

Opens and closes the Web Search sub-palette. See the documentation for the Web Search Palette for details. By clicking on the on the ◂ button the Web Search Palette will open.

Opens and closes the Some Tools sub-palette which includes the five buttons that follow.

The WorkLife Functions button opens up the Show WorkLife Functions dialog. Use this dialog to quickly find the properties of specific functions in this package.
This dialog looks like:
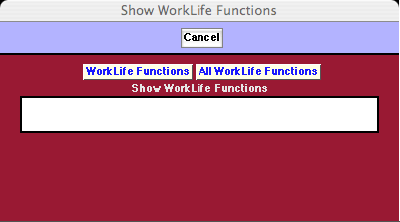
The Show Diary Functions dialog
To make use of this dialog type in a partial name of a function in this package, then click on WorkLife Functions. A new window will open up with a list of all of the functions in this package that contain the partial name that was given. Each item in the list is a hyperlink that, when clicked on, gives information on its function.

These two buttons control the "Dashboard" functionality in this package. The Dashboard button opens up all of the dashboard elements that the user has set up. The Toggle button toggles between making the dashboard elements visible and invisible.

This button opens up Mathematica's Slide Show Palette. Note that the "Convert Notebook" button on Mathematica's Slide Show Palette replaces the current notebook with the converted one. The following two buttons convert Diaries and NOtebooks to Slide shows; however, they do this in a non-destructive way by creating a distinct slide show notebook while maintaining the original one unchanged.

This button converts the current Diary into a slideshow and saves the resulting notebook in the Notebooks subdirectory of the current Diary's directory. The resulting slide show notebook's name is the same as the Diary's name with the characters "SS" appended to the end. If the current Diary is not open it is opened first.

This button converts the current InputNotebook into a slideshow and saves the resulting notebook in the Notebooks subdirectory of the current Diary's directory. The resulting slide show notebook's name is the same as the notebook's name with the characters "SS" appended to the end. If there is no notebook selected then an error message is returned.


The Backup Notebook button backs up the current state of the Input Notebook in its directory. An Alert Dialog appears while the backup is in progress.

The Encrypt Notebook button opens a dialog that allows you to create an encrypted file that contains a copy of a notebook.
The resulting dialog looks like:
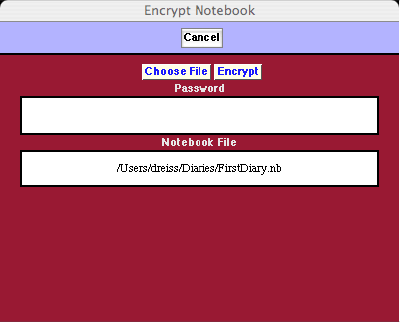
The Encrypt Notebook Dialog
When this dialog opens the full file path for the currently selected InputNotebook appears in its Notebook File field. A different notebook can be chosen by clicking the Choose File button. To create the encrypted file, a password must be typed into the Password field. Then, clicking the Encrypt button creates a file in the same directory as the Notebook File with the suffix .m and the same name as the original file but with the string ENB appended to its end. Thus in the case in the illustration above the encrypted version of the file /Users/dreiss/Documents/Diaries/FirstDiary.nb will be /Users/dreiss/Documents/Diaries/FirstDiaryENB.m. The resulting file can be decrypted using the Decrypt Notebook button below or by using the function DecryptNotebook["file","password"].
If you wish to send an encrypted notebook to someone who does not own a copy of A WorkLife FrameWork™, you can send them a piece of Mathematica code that will allow them to decrypt the file so long as they have the password that you Encrypted the notebook with. You can generate a Notebook with the required decrypting code with the function ExportableDecryptingFunction.
ExportableDecryptingFunction[] opens a notebook with a function DecryptEncryptedNotebook that can be used by individuals who do not have access to the WorkLife FrameWork™ Package to decrypt notebooks that have been encrypted using EncryptNotebook.
Usage Message for ExportableDecryptingFunction

The Decrypt Notebook button opens a dialog that allows you to create an encrypted file that contains a copy of a notebook.
The resulting dialog looks like:
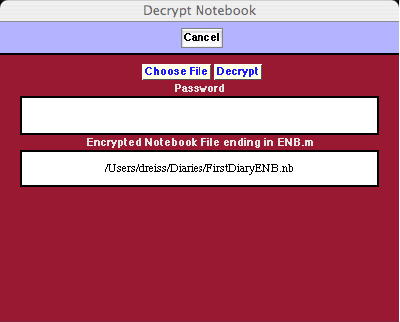
The Decrypt Notebook Dialog
In this image the file Users/dreiss/Documents/Diaries/FirstDiaryENB.m has been chosen. When the proper password is entered into the Password field and the Decrypt button is clicked a version of the original notebook is opened. Note that the resulting notebook is not saved to disk unless you explicitly save it.


The Archive Diary button opens a dialog asking you whether you want to archive the current Diary. When a Diary is archived all of its content is removed except for any outstanding ToDos. The ToDos are placed in a Section at the beginning of the Diary titled ToDos From Archived Diary. Before this is done the Diary is backed up and a copy of the Diary is also placed in a directory that has the original Diary's name with the string "XV" appended to it.

If the current Diary has previously been archived the Open Last Archive button will open the most recent Archive.

Opens a Notebook with information on the Archives of the current Diary.

Opens up the Archives Directory for your current Diary.

Opens and closes the Other Tools sub-palette which includes the ten buttons that follow.

Opens an informational notebook that displays the current values of key Directories and Files.

This button opens the directory where the current InputNotebook is located. If this notebook has not yet been saved an error message is returned.
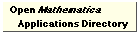
Opens the directory where Mathematica keeps user applications. In particular, the WorkLife FrameWork™ package is located in this directory along with its various settings files (and their automatically generated backups).

The Copy→OtherFiles button opens up a browsing window that allows you to select a file. A copy of this file will then placed in the OtherFiles subdirectory that is within the Current Diary's directory. If the selected file is a notebook an error message will be returned. For notebooks you should use the Copy→Notebooks button below.

The Copy→Notebooks button opens up a browsing window that allows you to select a notebook. A copy of this notebook will then placed in the Notebooks subdirectory that is within the Current Diary's directory. If the selected file is not a notebook an error message will be returned. For files other than notebooks you should use the Copy→OtherFiles button below.

Clicking on the Refresh Palettes button causes all of the currently open Palettes in this package to be refreshed.
Copyright ©, 2005→2007 Scientific Arts, LLC. All rights reserved.
|